
こんにちは。GMOグローバルサイン・ホールディングスCTO室で分散型IDの研究をしている開発者の神沼@t_kanumaです。
これまでの拙著では、IssuerによるAnonCredsとLDP-VCへの署名に、Indy Ledgerを基盤にしたdid:sovを用いてきました。この記事ではIndy Ledgerを用いずに、did:webを使いLDP-VCの発行と検証を試した結果を共有します。(Cryptographic SuiteはEd25519Signature2018とBBS+ Signature(BbsBlsSignature2020)双方で試しています。)
ACA-Pyでデフォルト実装されているDID Method
Issuer、Holder、VerifierのAgentにはこれまで同様、ACA-Pyを使います。
did:webによるVC署名の対応はACA-Pyに無く、新たに組み込む形を取ります。本題に入る前に、ACA-Pyでデフォルト実装されているDIDについて以下の表にまとめます。
| VCフォーマット | IssuerによるVC署名 | HolderによるVP署名 |
|---|---|---|
| AnonCreds | did:sov | Link Secret使用のため無し |
| LDP-VC (Signature Suite: Ed25519Signature2018) |
did:sov, did:key | did:key |
| LDP-VC (Signature Suite: BbsBlsSignature2020) |
did:key | did:key |
Verifierが使うResolver機能の実装としては、did:sov, did:key, did:webにデフォルトで対応してます。必要なのはdid:webをVC署名に扱えるようにすることです。
以下の開発ドキュメントを参考にし、ACA-PyのPluginを作り、これを達成します。
環境
今回の環境図です。
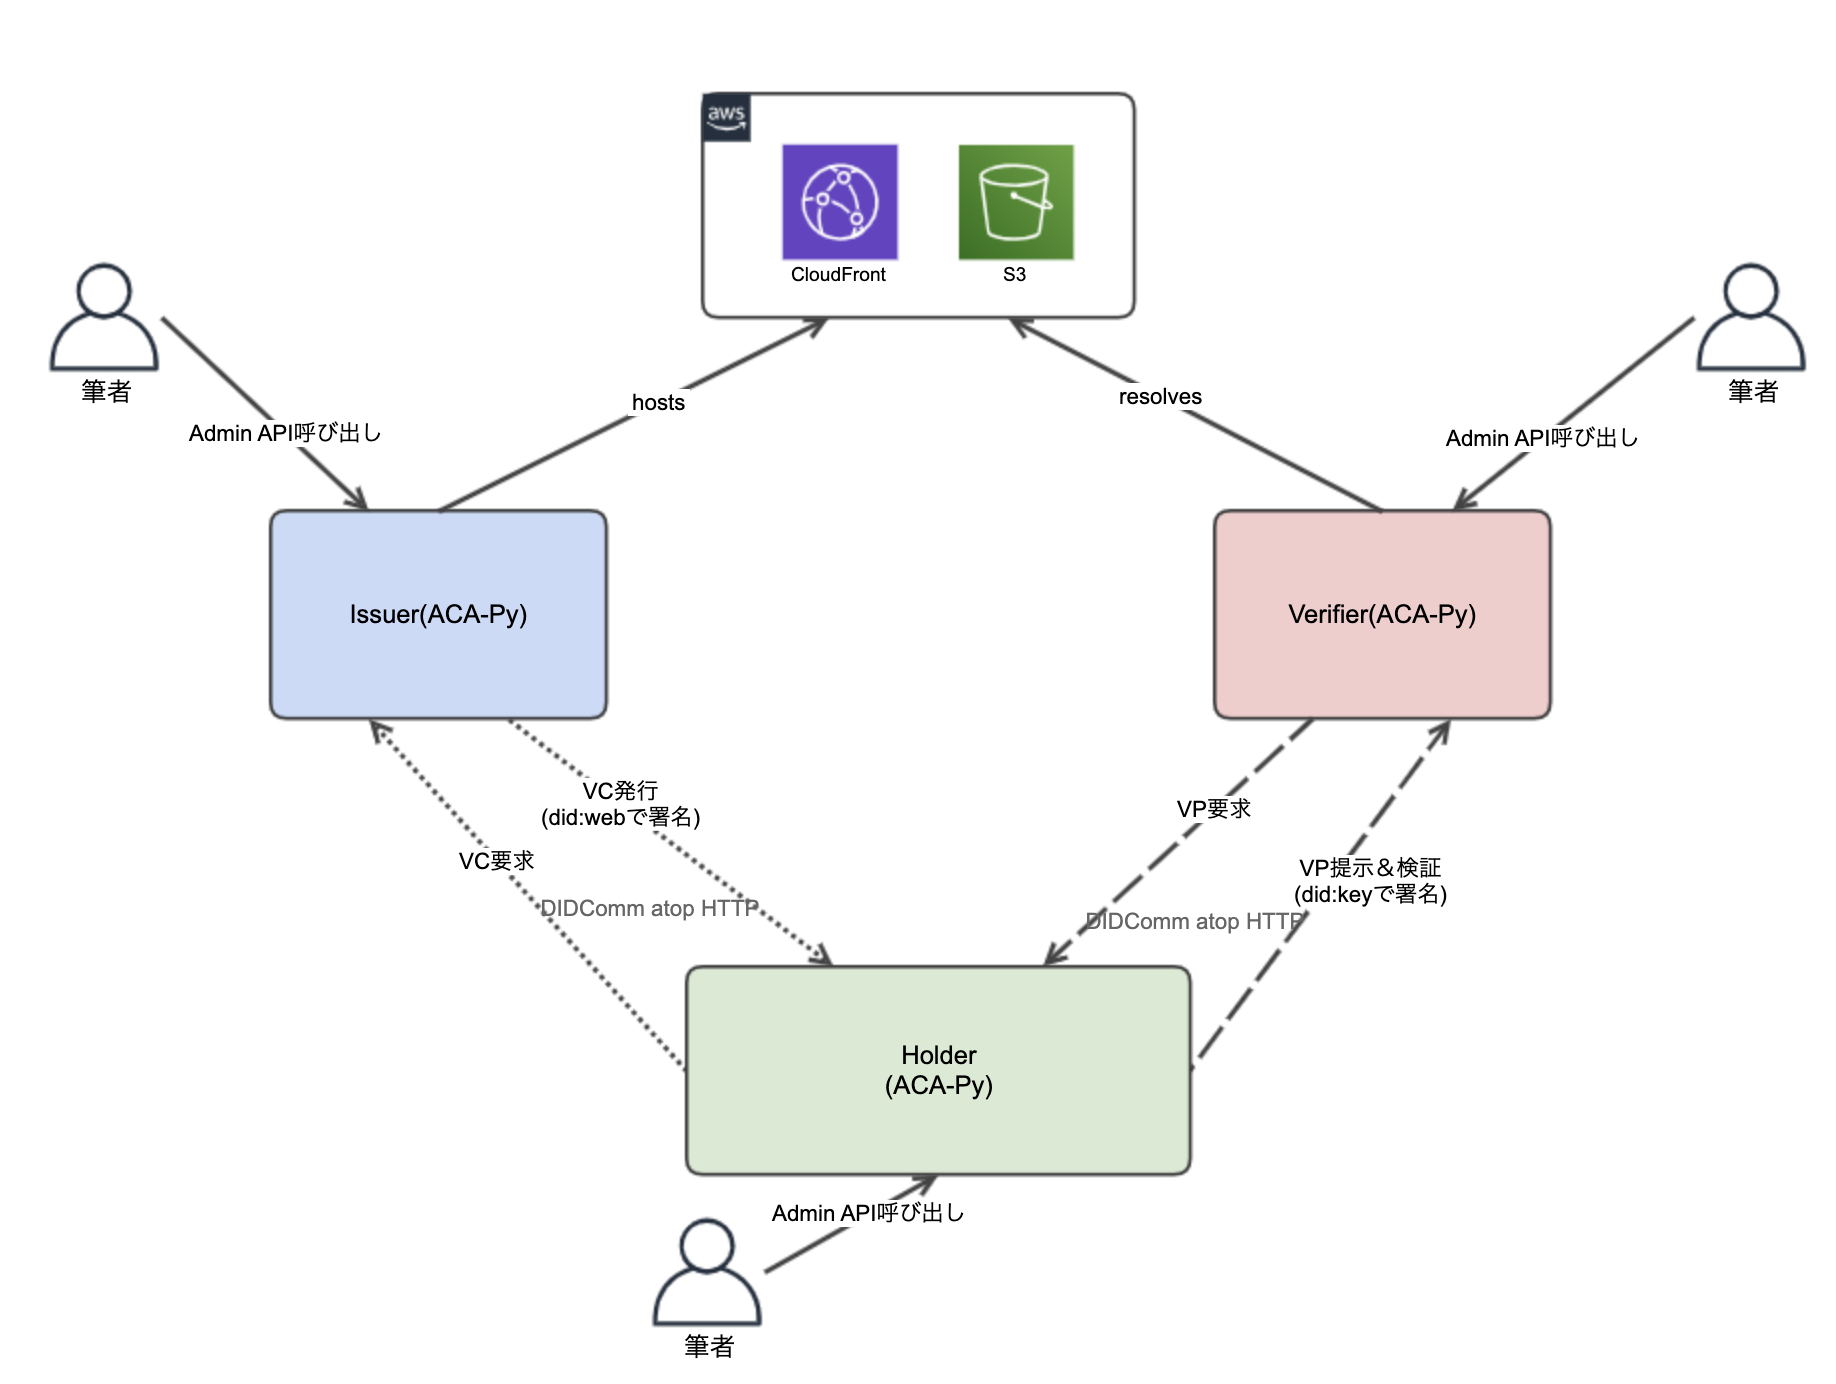
上図のポイントを列挙します。
- ACA-Pyのバージョンは執筆時点で最新の0.10.4です。
- IssuerによるVCへの署名にはdid:sovを使わないため、Indy Ledgerを使いません。
- HolderへのVPへの署名にはこれまで通りdid:keyを使います。
- これまでと同様、各AgentはローカルのDockerコンテナ環境に作ります。
- did:webによるDID Documentを作成し、AWS(CloudFront + S3)にホストします。
ACA-Py起動パラメーター
今回私が設定したIssuer、Holder、Verifierの起動パラメーターは基本的に以下の通りです。(IssuerのみPluginを利用するため少し変更が入ります。詳しくは後述します。)
ポイントを列挙します。
- 前述した通りIndy Ledgerを必要としません。そのため拙著の内容に加えて、起動パラメーターに”no-ledger”を追加しIndy Ledgerに繋がずに起動させています。
- Indy SDKが持つ複数の機能が別々のライブラリにさ分割され、ACA-Py 0.9からはその再実装されたライブラリを利用することが推奨になりました。(これまでのIndy SDKの利用は非推奨。)これを効かせるために、起動パラメーターの”wallet-type”の値を”indy”から”askar”に変更しています。(詳細は記事の最後尾にて備考として説明します。)
services:
  acapy:
    build:
      context: ../..
      dockerfile: ./docker/Dockerfile.run
    ports:
      - "${DIDCOMM_PORT}:${DIDCOMM_PORT}"
      - "${ADMIN_API_PORT}:${ADMIN_API_PORT}"
    volumes:
        - type: bind
          source: /Users/takahiro-kanuma/VSCodeProjects/sandbox/ssi-sandbox/oss/aca-py-${ACAPY_VERSION}/docker/${LABEL}
          target: /home/indy/logs
    entrypoint: /bin/bash
    command: [
      "-c",
      "aca-py \
      start \
      --label ${LABEL} \
      --inbound-transport http '0.0.0.0' ${DIDCOMM_PORT} \
      --endpoint ${DIDCOMM_ENDPOINT} \
      --outbound-transport http \
      --admin '0.0.0.0' ${ADMIN_API_PORT} \
      --admin-insecure-mode \
      --auto-ping-connection \
      --auto-respond-messages \
      --auto-accept-invites \
      --auto-accept-requests \
      --preserve-exchange-records \
      --wallet-type askar \
      --wallet-name ${WALLET_NAME} \
      --wallet-key ${WALLET_KEY} \
      --auto-provision \
      --no-ledger \
      --log-json-fmt \
      --timing \
      --log-level ${LOG_LEVEL} "
    ]
    networks:
      agent_nw:
        ipv4_address: ${IP}
networks:
  agent_nw:
    external: true
did:webのDID Documentの作成
本記事のメイン部分です。
1. Pluginの作成
既存コードからPluginする箇所の調査
以下、config/default_context.pyから抜粋したコードです。L12~17の各種インスタンスのInjection部分でDIDMethodsとBasicVerificationKeyStrategyがdid:sovおよびdid:keyへの対応に固定されています。ここにdid:webへの対応を入れます。
# https://github.com/hyperledger/aries-cloudagent-python/blob/0.10.4/aries_cloudagent/config/default_context.py
class DefaultContextBuilder(ContextBuilder):
    """Default context builder."""

    async def build_context(self) -> InjectionContext:
        """Build the base injection context; set DIDComm prefix to emit."""
        context = InjectionContext(settings=self.settings)
        context.settings.set_default("default_label", "Aries Cloud Agent")

        # omit...

        # Global did resolver
        context.injector.bind_instance(DIDResolver, DIDResolver([]))
        context.injector.bind_instance(DIDMethods, DIDMethods())
        context.injector.bind_instance(KeyTypes, KeyTypes())
        context.injector.bind_instance(
            BaseVerificationKeyStrategy, DefaultVerificationKeyStrategy()
        )

        # omit...
Plugin実装とビルド
poetryでPythonプロジェクトを作り、以下を実装します。
- DIDMethodsへのdid:webの追加
- BasicVerificationKeyStrategyのデフォルト実装であるDefaultVerificationKeyStrategyの置き換え
Pluginのコードは以下の通りです。実装後、poetryでビルドファイルを生成します。
# __init__.py
import logging
from abc import ABC, abstractmethod
from typing import List, Optional

from aries_cloudagent.config.injection_context import InjectionContext
from aries_cloudagent.core.profile import Profile
from aries_cloudagent.did.did_key import DIDKey
from aries_cloudagent.wallet.default_verification_key_strategy import \
    BaseVerificationKeyStrategy
from aries_cloudagent.wallet.did_method import (DIDMethod, DIDMethods,
                                                HolderDefinedDid)
from aries_cloudagent.wallet.key_type import BLS12381G2, ED25519, KeyType

LOGGER = logging.getLogger(__name__)

# Ed25519Signature2018, BBS+ Signature双方に対応できるようkey_typeを設定
# method specific identifierはACA-Pyユーザーが決めるよう設定
WEB = DIDMethod(
    name="web",
    key_types=[ED25519, BLS12381G2],
    rotation=True,
    holder_defined_did=HolderDefinedDid.REQUIRED
)

# wallet.default_verification_key_strategy.pyのDefaultVerificationKeyStrategyを参考に作成
class DidWebVerificationKeyStrategy(BaseVerificationKeyStrategy):
    async def get_verification_method_id_for_did(
        self,
        did: str,
        profile: Optional[Profile],
        allowed_verification_method_types: Optional[List[KeyType]] = None,
        proof_purpose: Optional[str] = None,
    ) -> Optional[str]:

        if did.startswith("did:key:"):
            return DIDKey.from_did(did).key_id
        # did:webの追加
        # VCのproof.verificationMethodを以下のDID URLに設定
        elif did.startswith("did:sov:") or did.startswith("did:web:"):
            LOGGER.info("did:sov: or did:web: found")
            return did + "#key-1"

        return None

async def setup(context: InjectionContext):
    # did:webを扱えるよう上記のWEBインスタンスを登録
    methods = context.inject(DIDMethods)
    methods.register(WEB)

    # DefaultVerificationKeyStrategyインスタンスを解除して、上記クラスのインスタンスをバインド
    context.injector.clear_binding(BaseVerificationKeyStrategy)
    context.injector.bind_instance(
            BaseVerificationKeyStrategy, DidWebVerificationKeyStrategy()
        )
2. dockerfileの作成
既存のDockerfile.runを基にIssuer用のdockerfileを作ります。
以下のL26-27が追記部分です。ビルドしたPluginパッケージをコンテナのPython実行環境にインストールしています。
FROM python:3.9-slim-bullseye

ENV ENABLE_PTVSD 0

RUN apt-get update && apt-get install -y curl && apt-get clean
ADD requirements*.txt ./

RUN pip3 install --no-cache-dir \
    -r requirements.txt \
    -r requirements.askar.txt \
    -r requirements.bbs.txt \
    -r requirements.dev.txt

RUN mkdir aries_cloudagent && touch aries_cloudagent/__init__.py
ADD aries_cloudagent/version.py aries_cloudagent/version.py
ADD bin ./bin
ADD README.md ./
ADD setup.py ./

RUN pip3 install --no-cache-dir -e .

RUN mkdir logs && chmod -R ug+rw logs
ADD aries_cloudagent ./aries_cloudagent

# Pluginパッケージのインストール
ADD did_web_plugin-0.1.0-py3-none-any.whl ./
RUN pip3 install --no-cache-dir did_web_plugin-0.1.0-py3-none-any.whl

ENTRYPOINT ["/bin/bash", "-c", "aca-py \"$@\"", "--"]
3. Issuerのdocker-compose.ymlの修正と起動
前述のdocker-compose.ymlを修正します。
上記2で作成したdockerfileを参照し(L5)、コンテナ起動時にPluginを読み込むよう起動パラメーターを追加します(L34)。
services:
  acapy:
    build:
      context: ../..
      dockerfile: ./docker/Dockerfile.run-wt-didweb-plugin
    ports:
      - "${DIDCOMM_PORT}:${DIDCOMM_PORT}"
      - "${ADMIN_API_PORT}:${ADMIN_API_PORT}"
    volumes:
        - type: bind
          source: /Users/takahiro-kanuma/VSCodeProjects/sandbox/ssi-sandbox/oss/aca-py-${ACAPY_VERSION}/docker/${LABEL}
          target: /home/indy/logs
    entrypoint: /bin/bash
    command: [
      "-c",
      "aca-py \
      start \
      --label ${LABEL} \
      --inbound-transport http '0.0.0.0' ${DIDCOMM_PORT} \
      --endpoint ${DIDCOMM_ENDPOINT} \
      --outbound-transport http \
      --admin '0.0.0.0' ${ADMIN_API_PORT} \
      --admin-insecure-mode \
      --auto-ping-connection \
      --auto-respond-messages \
      --auto-accept-invites \
      --auto-accept-requests \
      --preserve-exchange-records \
      --wallet-type askar \
      --wallet-name ${WALLET_NAME} \
      --wallet-key ${WALLET_KEY} \
      --auto-provision \
      --no-ledger \
      --plugin did_web_plugin \
      --log-json-fmt \
      --timing \
      --log-level ${LOG_LEVEL} "
    ]
    networks:
      agent_nw:
        ipv4_address: ${IP}
networks:
  agent_nw:
    external: true
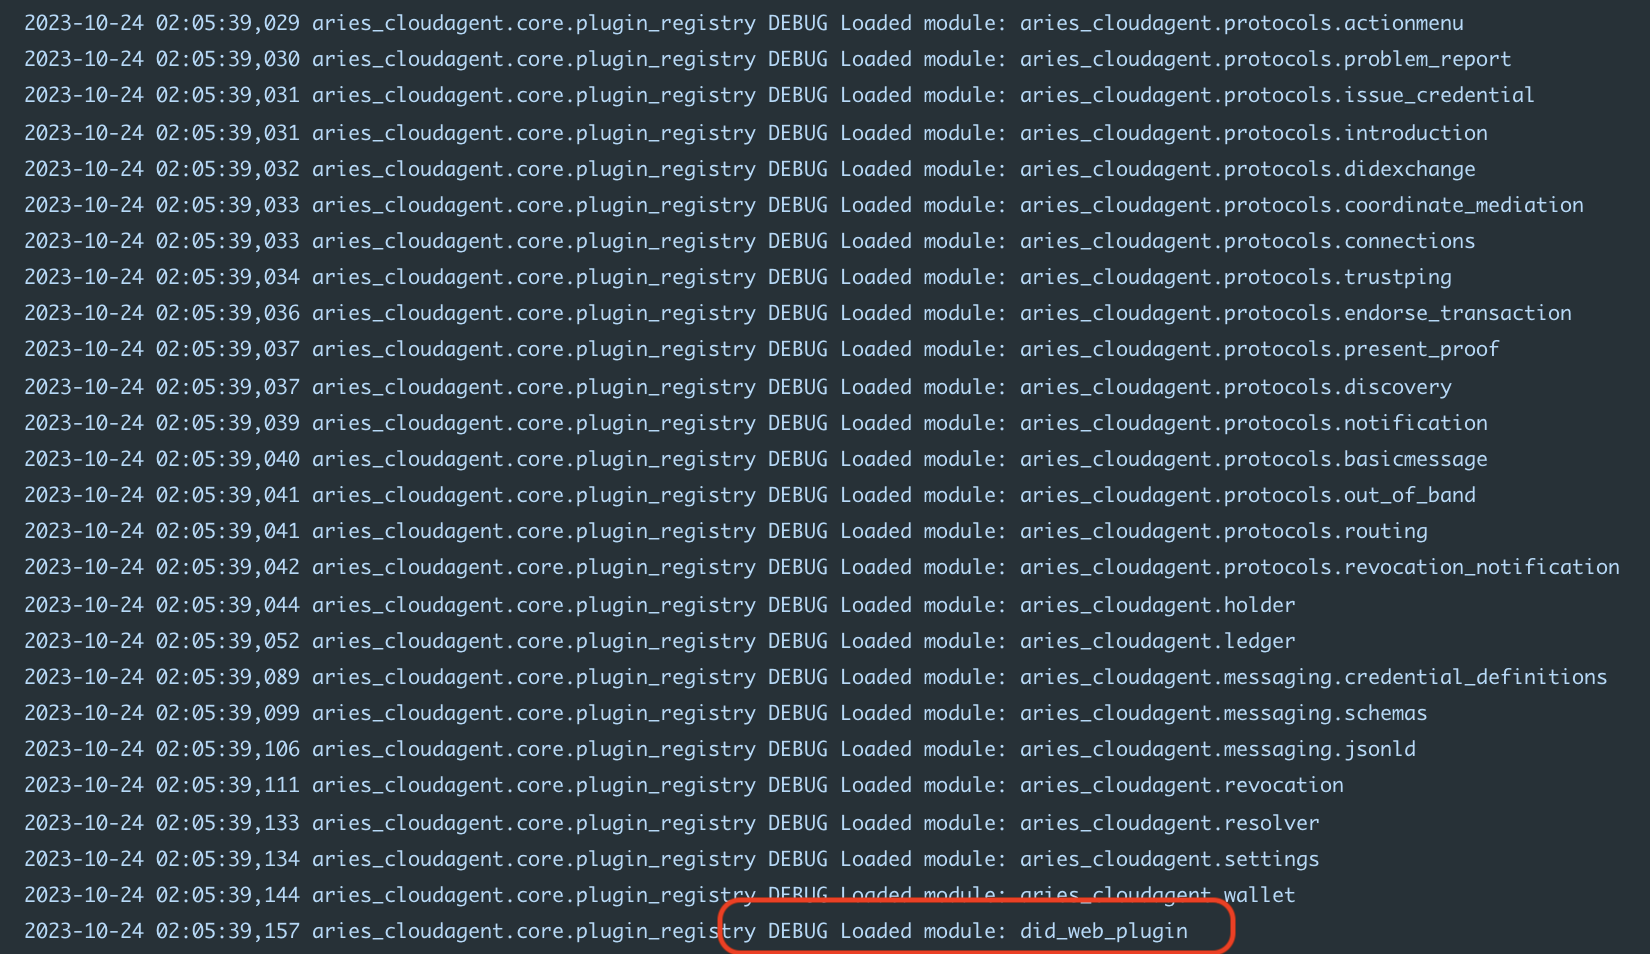
起動後、ログを確認すると作成したPluginを読み込んでいることがわかります。
4. ドメインの取得と公開鍵ペアの生成
事前にAWS CloudFrontでディストリビューションを作成し、DIDのMethod Specific Identiferの部分に成るドメインを取得しておきます。
起動したIssuer ACA-PyのAdmin API Endpointを叩き、DIDに紐づける公開鍵ペアを生成します。以下、リクエストとレスポンスです。BBS+ Signatureの場合は、key_typeをbls12381g2に設定します。
(なお、現在の実装ではDIDに紐付けられる公開鍵ペアは1つのみです、つまりDID Documentに複数の公開鍵を持たせることはできません。)
curl -X 'POST' \
  'http://localhost:8031/wallet/did/create' \
  -H 'accept: application/json' \
  -H 'Content-Type: application/json' \
  -d '{
    "method": "web",
    "options": {
        "did": "did:web:dijx0shbtuy59.cloudfront.net",
        "key_type": "ed25519"
    }
}'
{
  "result": {
    "did": "did:web:dijx0shbtuy59.cloudfront.net",
    "verkey": "EcgXdKwPuqU6gYjT3NoFm9jTtJtK9hjfz8Mxg1nctQTz"",
    "posture": "wallet_only",
    "key_type": "ed25519",
    "method": "web"
  }
}
5. DID Documentの作成
手作成します。
- Verification MethodのIDをPluginの実装で指定した通りのDID URLにします。
- BBS+ Signatureの場合は、verification method typeプロパティの値をBls12381G2Key2020にします。
- assertionMethodはDIDの仕様上、VCを発行する用途のVerification Relationshipです。仕様にある通り、VC発行のためにはverificationMethodがこれに紐づけられている必要があります。実際、ACA-Pyの実装においてこのプロパティが無いとVC発行時にエラーが出ます。
{
  "@context": [
    "https://www.w3.org/ns/did/v1",
  ],
  "id": "did:web:dijx0shbtuy59.cloudfront.net",
  "verificationMethod": [
    {
      "id": "did:web:dijx0shbtuy59.cloudfront.net#key-1",
      "type": "Ed25519VerificationKey2018",
      "controller": "did:web:dijx0shbtuy59.cloudfront.net",
      "publicKeyBase58": "EcgXdKwPuqU6gYjT3NoFm9jTtJtK9hjfz8Mxg1nctQTz"
    }
  ],
  "assertionMethod": ["did:web:dijx0shbtuy59.cloudfront.net#key-1"]
}
6. AWSへのホスティング
CloudFrontとS3にDID Documentをホストします。詳細は割愛します。
S3 Bucket上のファイルパスは”.well-known/did.json”です。
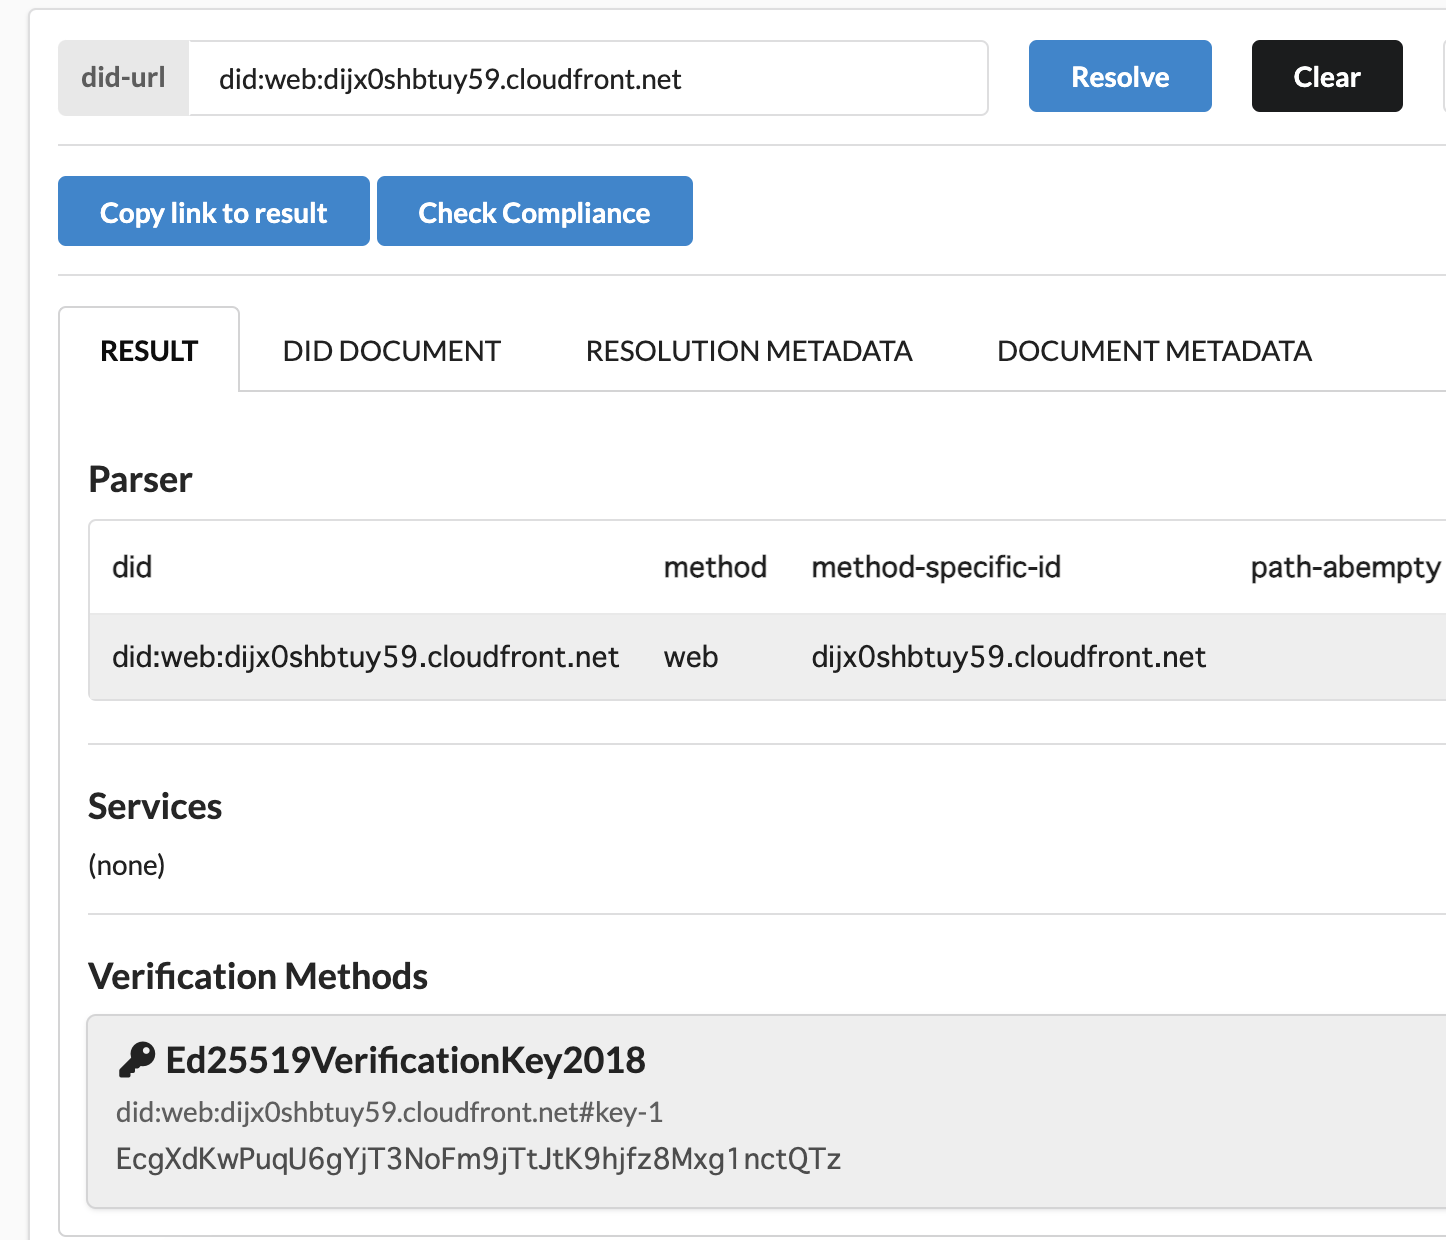
7. DIDがresolveされることの確認
以下に示す通り、ACA-PyとDIF Universal ResolverからDIDを問題なくresolveすることができました。ここまででLDP-VCの発行と検証をするための準備が整いました。
ACA-PyのResolver機能
以下、Admin APIのリクエストとレスポンスです。
curl -X 'GET' \  'http://localhost:8021/resolver/resolve/did%3Aweb%3Adijx0shbtuy59.cloudfront.net' \
  -H 'accept: application/json'
{
  "did_document": {
    "@context": [
      "https://www.w3.org/ns/did/v1",
      "https://w3id.org/security/suites/ed25519-2018/v1"
    ],
    "id": "did:web:dijx0shbtuy59.cloudfront.net",
    "verificationMethod": [
      {
        "id": "did:web:dijx0shbtuy59.cloudfront.net#key-1",
        "type": "Ed25519VerificationKey2018",
        "controller": "did:web:dijx0shbtuy59.cloudfront.net",
        "publicKeyBase58": "EcgXdKwPuqU6gYjT3NoFm9jTtJtK9hjfz8Mxg1nctQTz"
      }
    ],
    "assertionMethod": [
      "did:web:dijx0shbtuy59.cloudfront.net#key-1"
    ]
  },
  "metadata": {
    "resolver_type": "native",
    "resolver": "WebDIDResolver",
    "retrieved_time": "2023-10-25T02:30:03Z",
    "duration": 398
  }
}
DIF Universal Resolver
動作確認
LDP-VCの発行と検証方法については割愛します。詳細は以下の拙著をご参照ください。
- 【Hyperledger Aries】ACA-PyでW3C準拠のLDP-VCの発行と検証を試す
- 【Hyperledger Aries】ACA-PyでW3C準拠のLDP-VCの発行と検証を試す(BBS+ Signature編)
結果
結論から先に述べると、Ed25519Signature2018、BBSBlsSignature2020双方において正常にVC発行からVP検証まで完了することができました。(念の為、did:webのDocumentの公開鍵を改竄すると、Holder上でVP提示時に不当なVCとしてエラーが出るところまで確認しました。)
VC発行と保管
上記拙著との細かな違いとしては、VC発行オファーにおいてACA-Py Admin API Endpointの呼び出しに対し、Request Bodyのissuerプロパティに今回のdid:webを指定しています。
実際に発行されたVCは以下の通りです。(Ed25519Signature2018)
{
   "@context":[
      "https://www.w3.org/2018/credentials/v1",
      "https://w3id.org/citizenship/v1"
   ],
   "type":[
      "VerifiableCredential",
      "PermanentResident"
   ],
   "issuer":"did:web:dijx0shbtuy59.cloudfront.net",
   "issuanceDate":"2023-06-20T00:00:00Z",
   "credentialSubject":{
      "type":[
         "PermanentResident"
      ],
      "givenName":"Taro",
      "familyName":"Yamada",
      "gender":"Male",
      "birthCountry":"Japan",
      "birthDate":"2020-01-01",
      "id":"did:key:z6MkgAidziYNfiaKFNdbqckppbYJaX47wjn9nEpRj3H54gDS"
   },
   "proof":{
      "type":"Ed25519Signature2018",
      "verificationMethod":"did:web:dijx0shbtuy59.cloudfront.net#key-1",
      "created":"2023-10-24T08:15:09.553703+00:00",
      "proofPurpose":"assertionMethod",
      "jws":"eyJhbGciOiAiRWREU0EiLCAiYjY0IjogZmFsc2UsICJjcml0IjogWyJiNjQiXX0..q1IqdlOAhfgSgggfm7v68lUe3RmQbiXdZetXx68zLQjJu_sUoH-5w3tc4xqHUEWqxUCwc3XiB81LMNKm_qzTBA"
   }
}
VP提示と検証
上記拙著との細かな違いとしては、Verifierが要求するVCの条件において、Issuer DIDを今回のdid:webに変更しています。実際に提示されるVPは以下の通りです。(Ed25519Signature2018)
{
   "@context":[
      "https://www.w3.org/2018/credentials/v1"
   ],
   "type":[
      "VerifiablePresentation"
   ],
   "verifiableCredential":[
      {
         "@context":[
            "https://www.w3.org/2018/credentials/v1",
            "https://w3id.org/citizenship/v1"
         ],
         "type":[
            "VerifiableCredential",
            "PermanentResident"
         ],
         "issuer":"did:web:dijx0shbtuy59.cloudfront.net",
         "issuanceDate":"2023-06-20T00:00:00Z",
         "credentialSubject":{
            "type":[
               "PermanentResident"
            ],
            "givenName":"Taro",
            "familyName":"Yamada",
            "gender":"Male",
            "birthCountry":"Japan",
            "birthDate":"2020-01-01",
            "id":"did:key:z6MkgAidziYNfiaKFNdbqckppbYJaX47wjn9nEpRj3H54gDS"
         },
         "proof":{
            "type":"Ed25519Signature2018",
            "proofPurpose":"assertionMethod",
            "verificationMethod":"did:web:dijx0shbtuy59.cloudfront.net#key-1",
            "created":"2023-10-24T08:15:09.553703+00:00",
            "jws":"eyJhbGciOiAiRWREU0EiLCAiYjY0IjogZmFsc2UsICJjcml0IjogWyJiNjQiXX0..q1IqdlOAhfgSgggfm7v68lUe3RmQbiXdZetXx68zLQjJu_sUoH-5w3tc4xqHUEWqxUCwc3XiB81LMNKm_qzTBA"
         }
      }
   ],
   "presentation_submission":{
      "id":"622ad266-79d6-4a94-bd6d-209ffcc8a8eb",
      "definition_id":"f5fc87a5-053d-4c0d-9aaa-7589256981f0",
      "descriptor_map":[
         {
            "id":"input_desc_1",
            "format":"ldp_vc",
            "path":"$.verifiableCredential[0]"
         }
      ]
   },
   "proof":{
      "type":"Ed25519Signature2018",
      "verificationMethod":"did:key:z6MkgAidziYNfiaKFNdbqckppbYJaX47wjn9nEpRj3H54gDS#z6MkgAidziYNfiaKFNdbqckppbYJaX47wjn9nEpRj3H54gDS",
      "created":"2023-10-25T00:18:08.627660+00:00",
      "proofPurpose":"authentication",
      "challenge":"3fa85f64-5717-4562-b3fc-2c963f66afa6",
      "jws":"eyJhbGciOiAiRWREU0EiLCAiYjY0IjogZmFsc2UsICJjcml0IjogWyJiNjQiXX0..Z5jI2zx-8eF5fz28orAIcsfKTWzCCdzYX8lxqxsRDfY6K-U5P52WfK2bTjIfqmSKdtadK5Pofv3zxNot7JxUBw"
   }
}
備考: ACA-Pyのアップデート
先に述べた通り、これまではバージョン0.8系のACA-Pyを使っていましたが今回は最新の0.10.4を使っています。ここでは以下のドキュメントより、0.9系からのIndy SDK周りのアップデートについて述べます。
ACA-PyやAFJはこれまで、AnonCredsの発行や検証に対しIndy SDKに依存してきました。
このアップデートではIndy SDKが持つ以下の個々の機能が別プロジェクトとして分割、再実装され、ACA-Pyから利用することができます。ドキュメントによればこのアップデートにより、モジュール性だけでなくパフォーマンスも向上していると記載があります。(またAFJでもバージョン0.4から脱Indy SDKの同様のアップデートがありました。)
- Aries Askar
- AgentのWallet部分、つまりDIDの秘密鍵や、VC、他Agentとのやりとりに関する情報を保管するライブラリです。
- これまでと同様に、背後のDBにはSQLiteもしくはPostgreSQLを利用できます。
- 再実装であるため、データの暗号化方式やインポート/エクスポートに対しアーキテクチャレベルで大きな違いはない模様です。ご参考までにこの部分に関しては記事にしています。
- Indy VDR: 任意のHyperledger Indyネットワークとやりとりするためのクライアントライブラリです。
- CredX: Hyperledger Indyを基盤にAnonCredsの発行や検証を担当するライブラリです。今後、特定のRegistry基盤に依存せずにAnonCredsを扱えるanoncred-rsに移行予定とのことです。
ACA-Py起動方法の変更点は、起動パラメーターのwallet-typeをaskarに変更するだけです。これで上記1、2、3を利用するようになります。
終わりに
Pluginを実装することで、Indy Ledgerを使わずに、did:webを用いてLDP-VCの発行と検証を完遂できました。どなたかのお役に立てたならば幸いです。