
こんにちは。GMOグローバルサイン・ホールディングスCTO室で分散型IDの研究開発をしている神沼@t_kanumaです。
これまでのHyperledger Indy/Ariesに関する拙著では、Holder AgentにCloud Agent専用のACA-Py(Aries Cloud Agent -Python)を使い疑似的に構築してきました。しかし物理世界で運転免許証や社員証、保険証を自分の財布やバッグの中に持つように、Holder Agentは本来、Edge AgentとしてVC(Verifiable Credential)を含むWalletをモバイルデバイス内に持ちます。
前編、中編、後編からなるこの記事では、Hyperledger Ariesの実装の1種でモバイルアプリを開発可能なAFJ(Aries Framework JavaScript)を基盤に使い、独自のReact Native製Holder Agentを作成する様子をお届けします。またそのHolderをMediator、Issuer、Verifierと繋げて、VC発行や失効、Proof検証といったVCモデルにおけるイベントを一通り実行した流れを記載します。
今回の前編ではAFJの把握を目的として、まずNode.js環境で擬似的なHolder Agentを作り動かます。後編ではそれをベースにReact Nativeアプリを作り動かします。
前提
Hyperledger Indy/Ariesとは何か、またAriesのアーキテクチャなどについては以下の拙著をご参照ください。
- SSI/VCモデルとHyperledger Indy/Ariesを使ったシステム構築実証[前編] (a)
- SSI/VCモデルとHyperledger Indy/Ariesを使ったシステム構築実証[後編] (b)
また以下の拙著の内容を前提にしています。ご了承ください。
- DockerとHyperledger Indy/AriesでSSIシステムのローカル開発環境を構築する (c)
- 【Hyperledger Aries】Aries Cloud Agent – PythonにおけるMediation機能を試す (d)
- 【Hyperledger Aries】Aries Cloud Agent – PythonにおけるMultitenant/Endorse機能を試す (e)
- 【Hyperledger Indy/Aries】ACA-PyでVerifiable Credentialを失効させる (f)
- 【Hyperledger Aries】ACA-Pyと3つのコネクション生成プロトコル (g)
- 【Hyperledger Aries】モバイルアプリ型Holder Agentの開発における選択肢 (h)
AFJとACA-Py
処理方式における差異
AFJとACA-Pyとの大きな違いは、開発者が実装するControllerの在り方です。
ACA-Pyでは機能をREST API形式で提供し、開発者はそれを呼び出すControllerを別プロセスで作ります。一方AFJでは、一般的なWebフレームワークのそれと同じで、Node.jsの1つのパッケージとして提供され、Controllerは同じプロセスで動作します。
相互運用性
AFJもACA-PyもAries RFC群を実装するソフトウェアですが、お互いに同じRFCを実装していないと通信できません。
以下、両者がサポートするRFCの一覧を記載しているページです。
ここで上記のページから、2022/8/4時点において両者が後述の動作確認で利用する主なRFCを実装しているかどうかを確認します。以下、◯は両者サポート済みということで問題ない意味です。△はドキュメントの解釈によっては上手くいかない可能性が残る部分です。
| RFC名 | AFJ as Holder | ACA-Py as Issuer, Verifier, Mediator |
|---|---|---|
| Connection Protocol 1.0 | ◯ | ◯ |
| DID Exchange Protocol 1.0 | ◯ | ◯ |
| Out-Of-Band Protocol 1.1 | ◯ | ◯ |
| Issue Credential Protocol 1.0 | ◯ | ◯ |
| Present Proof Protocol 1.0 | ◯ | ◯ |
| Mediator Coordination Protocol | ◯ | △ |
| Indy: Credential Revocation | △ | ◯ |
以下、△とした部分について述べます。
MediationについてACA-Pyでは以下の注釈が付いています。
Only pre-AIP 2.0 version. Must be updated to use did:key for full AIP 2.0 support.
did:keyはPairwise DIDの1種で、method specific identifierから公開鍵の種別と値をresolveできるDIDメソッドです。DIDのupdateとdeactivateはサポートされておらず、長期使用は非推奨で、Ariesでは後に置き換えられるConnection確立のためのrecipientKeyや、Mediation確立のためのroutingKeyなど、一時的な用途に使われています。
拙著(d)にて、routingKeyがdid:keyになっている形でMediationが機能することを確認済みであるため、問題ないと考えます。実際、動作させてみて機能することを確認済みです。(後述します。)
RevocationについてAFJでは以下の機能が実装中である記述がありますが、これはVerifierとしては使えないということだと考えます。実際、Holderとして動作させた時にVC失効の一連の流れが機能することを確認済みです。(後述します。)
Receiving and Verifying revocable Indy Credentials.
以下、その他備考です。
- Issue Credential ProtocolおよびPresent Proof Protocolの最新バージョンは2.0ですが、当記事では今までの記事の通り1.0を使います。(今後このバージョン間の特徴的な差を記事にできたらと思っています。)
- Aries Framework GoやAries Framework .NETを含めてフレームワーク間でどれだけ相互運用性が担保されているかのテスト結果が公開されています。AFJとACA-Py間では相互運用性テストを78%パスしていると見て取れます。
動作環境
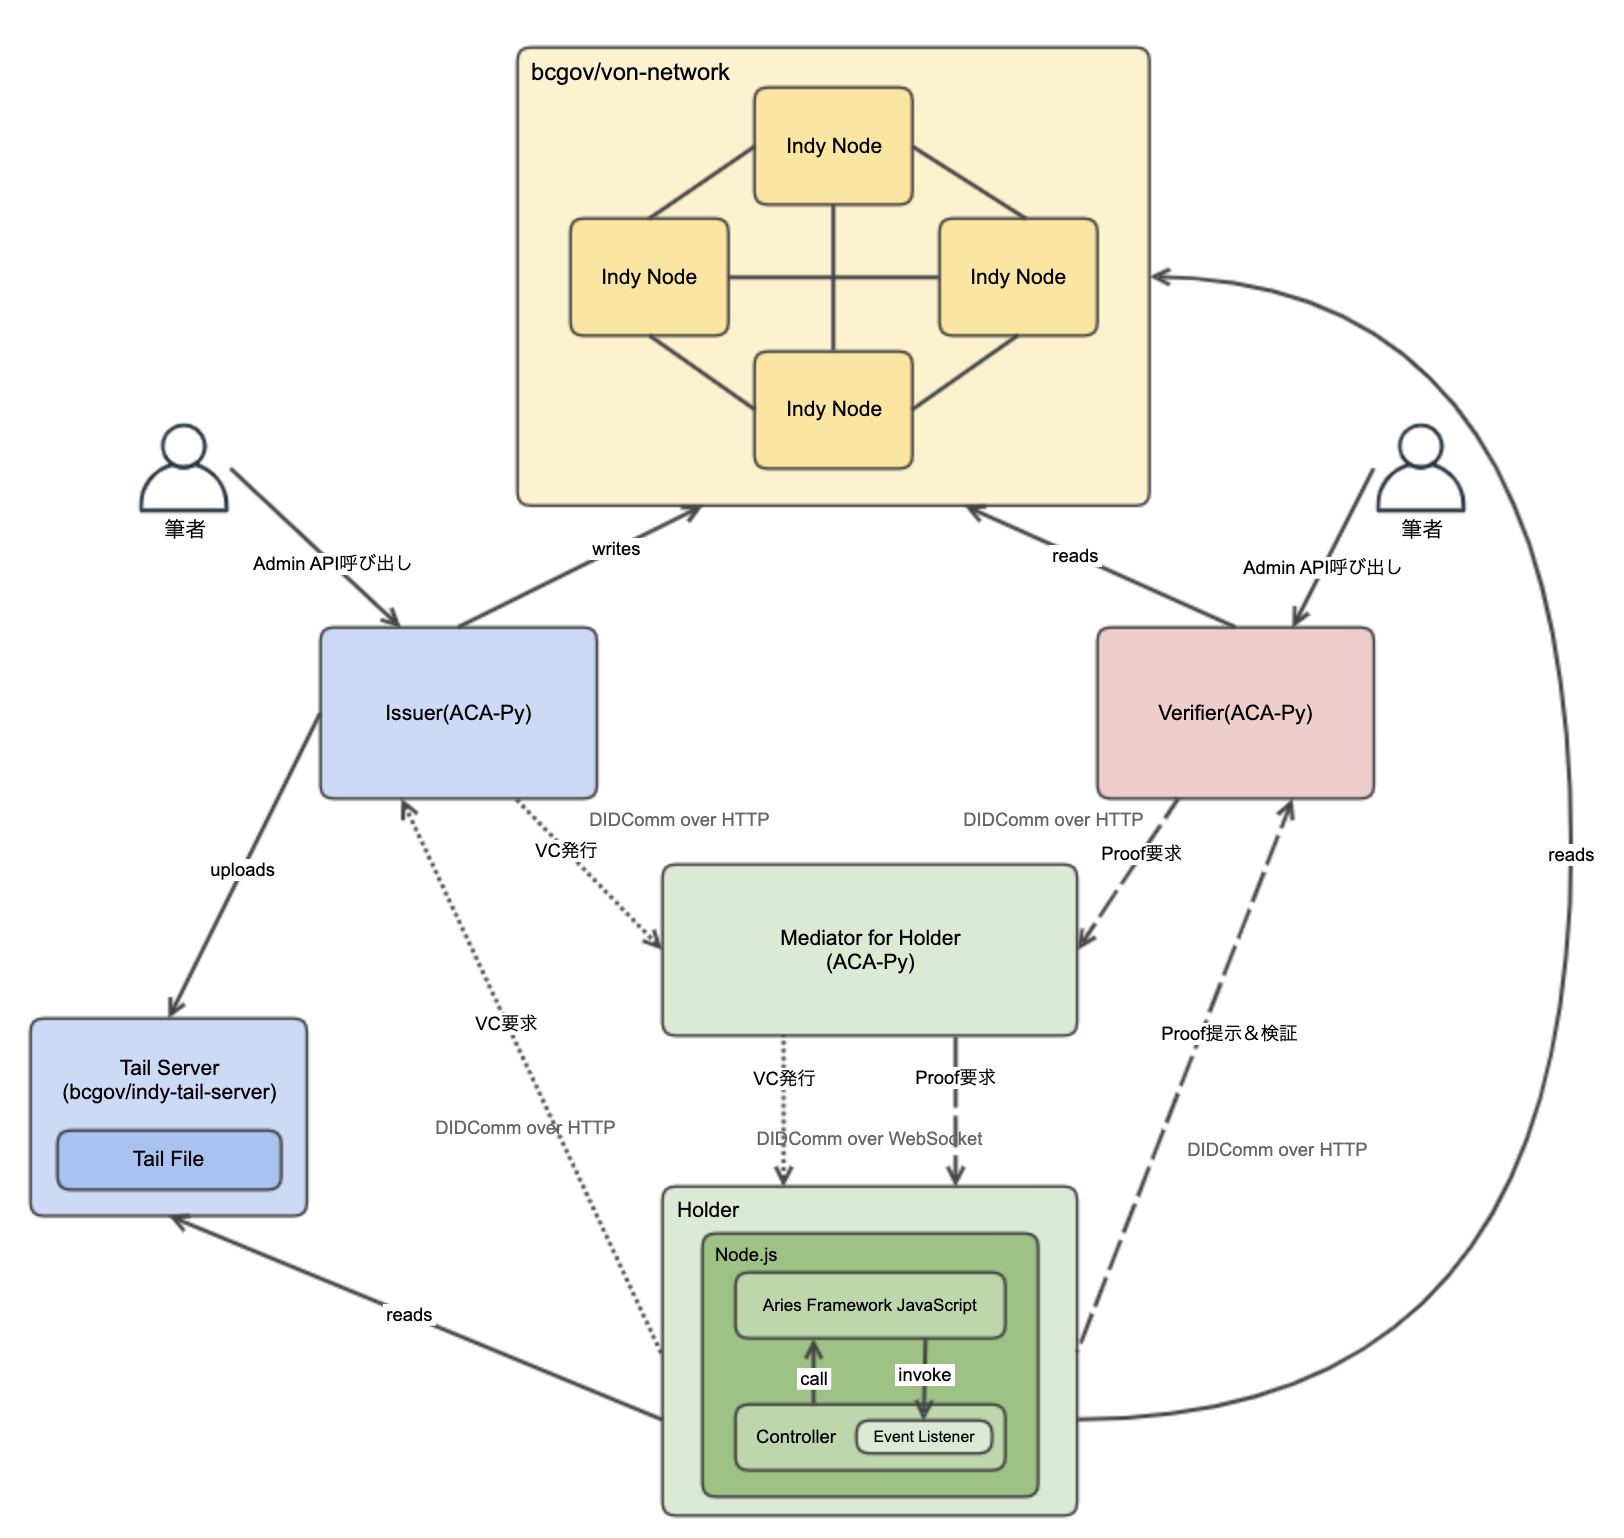
ローカルのPC環境にて下図の通り環境を構築します。ポイントを列挙します。
- 各要素、すなわち4つのIndy Node、Issuer、Holder、Mediator、Verifier、そしてTail Serverは全てDockerコンテナです。
- DIDComm通信のトランスポートプロトコルについて、MediatorからHolder方向での通信のみWebSocketを使います。他はHTTPです。
- IssuerとVerifierについて、Controller/Webhookは設けず筆者がSwagger UIからAdmin APIを叩く形でやりとりを進めます。
- HolderのWalletのソフトウェアは、AFJが内包しているSQLiteです。
- 各OSSのバージョンは以下の通りです。
- AFJ
- @aries-framework/core: 0.3.3
- @aries-framework/node: 0.3.3
- ACA-Py: 0.7.3
- von-network: 1.7.2
- indy-tail-server: 1.0.0
- AFJ
準備: Issuerに関するLedger上のTransaction
以下のIssuerに関するTransactionについては、あらかじめLedgerに作成しておきます。
- NYM – Public DID(did:sovメソッド)とそれに紐づく公開鍵を持つ。DID Documentに対し、それを構成する情報の一部を持つ。
- ATTRIB – Attribute。Public DIDを所有するAgentのEndpointを持つ。DID Documentに対し、それを構成する情報の一部を持つ。
- SCHEMA – VCのClaim定義を持つ。
- CRED_DEF – Credential Defiintion。Schemaの各Claimに対する公開鍵などを持つ。
- REVOC_REG_DEF – Revocation Registry Definition。 Credential Definitionに紐づきVCの失効管理を行うレジストリを定義する。
作成方法などの詳細は前述の拙著(b)、(c)、(e)をご参照ください。
Holder Agentの開発
メインパートです。
プロジェクト構造
シンプルにnpmもしくはyarnで作ったNode.jsプロジェクトのルートディレクトリに、Controllerとして実装したindex.tsを配置しました。
以下、package.jsonです。
{
  "name": "afj-client",
  "version": "1.0.0",
  "description": "",
  "main": "index.js",
  "scripts": {
    "start": "tsc && node dist/index.js",
    "lint": "eslint ."
  },
  "author": "Takahiro Kanuma",
  "license": "ISC",
  "dependencies": {
    "@aries-framework/core": "^0.3.3",
    "@aries-framework/node": "^0.3.3",
    "log4js": "^6.9.1"
  },
  "devDependencies": {
    "@tsconfig/node18": "^1.0.1",
    "@typescript-eslint/eslint-plugin": "^5.32.0",
    "@typescript-eslint/parser": "^5.32.0",
    "eslint": "^8.21.0",
    "eslint-config-prettier": "^8.5.0",
    "typescript": "^4.7.4"
  }
}
Dockerコンテナ周りの実装
Holder Agentはコンテナとして起動させます。ACA-Pyやvon-network、Tail Serverもコンテナであり、そうした方がやり易いからです。プロジェクトのルートディレクトリにDockerfileとdocker-compose.ymlを作ります。
以下、Dockerfileです。AFJが依存するindy-sdk、またindy-sdkが依存する各種ソフトウェアをインストールしています。この実装については、AFJの開発ガイドにおけるLinux環境へのインストレーションページを参考にしました。
FROM ubuntu:20.04

ENV DEBIAN_FRONTEND noninteractive

RUN apt-get update -y && apt-get install -y \
    software-properties-common \
    apt-transport-https \
    curl \
    # Only needed to build indy-sdk
    build-essential \
    git \
    libzmq3-dev libsodium-dev pkg-config libssl-dev

# libindy
RUN apt-key adv --keyserver keyserver.ubuntu.com --recv-keys CE7709D068DB5E88
RUN add-apt-repository "deb https://repo.sovrin.org/sdk/deb bionic stable"

# nodejs 16x LTS Debian
RUN curl -fsSL https://deb.nodesource.com/setup_16.x | bash -

# yarn
RUN curl -sS https://dl.yarnpkg.com/debian/pubkey.gpg | apt-key add - && \
    echo "deb https://dl.yarnpkg.com/debian/ stable main" | tee /etc/apt/sources.list.d/yarn.list

# install depdencies
RUN apt-get update -y && apt-get install -y --allow-unauthenticated \
    libindy \
    nodejs

# Install yarn seperately due to `no-install-recommends` to skip nodejs install
RUN apt-get install -y --no-install-recommends yarn

# postgres plugin setup
# install rust and set up rustup
RUN curl https://sh.rustup.rs -sSf | bash -s -- -y
ENV PATH="/root/.cargo/bin:${PATH}"

# cargo build failing on latest release of rust due to socket2 dependency in the plugin https://users.rust-lang.org/t/build-broken-with-parse-quote-spanned-is-ambiguous/80280/2 so pointing rust version to 1.63.0
RUN rustup default 1.63.0

# clone indy-sdk and build postgres plugin
RUN git clone https://github.com/hyperledger/indy-sdk.git
WORKDIR indy-sdk/libindy
RUN cargo build --release && mv target/release/libindy.so /usr/lib/libindy.so

# setup a user
RUN useradd --create-home holder
WORKDIR /home/holder

# install AFJ
COPY package.json yarn.lock tsconfig.json ./

RUN chown -R holder ./
USER holder

RUN yarn install && yarn cache clean

# invoke an agent.
COPY index.ts .
ENTRYPOINT ["npm", "start"]
以下、上記Dockerfileを参照するdocker-compose.ymlです。他Agent、Indy Ledger、Tail Serverと通信可能になるようネットワークの設定をしています。(既に作成済みのネットワークに含めるようにしています。)
version: "1.0"
services:
  holder:
    build:
      context: ./
      dockerfile: ./Dockerfile
    ports:
      - 8090:8090
    networks:
      agent_nw:
        ipv4_address: 172.19.0.9
      von_von:
networks:
  von_von:
    external: true
  agent_agent:
    external: true
Holder Controllerの実装
全てindex.ts内のコードですが、見やすくするため分けて記載します。以下の順で記載します。
- メインとなるFunction(Main Functionとする)
- Main Functionから切り出した、Agentの初期化のためのFunction
- Main Functionから切り出した、各イベント(Connection、Mediation、VC発行、VC失効、Proof提示検証)におけるEvent Listener群
1. Main Function
import fetch from "node-fetch";
import { agentDependencies, HttpInboundTransport } from "@aries-framework/node";
import {
  Agent,
  WsOutboundTransport,
  HttpOutboundTransport,
  ConnectionEventTypes,
  RoutingEventTypes,
  MediationState,
  DidExchangeState,
  CredentialEventTypes,
  CredentialState,
  ProofEventTypes,
  ProofState,
  AriesFrameworkError,
  ConsoleLogger,
  LogLevel,
  type InitConfig,
  type ConnectionStateChangedEvent,
  type CredentialStateChangedEvent,
  type ProofStateChangedEvent,
  type AcceptProofPresentationOptions,
  type MediationStateChangedEvent,
} from "@aries-framework/core";
import * as log4js from "log4js";
import { LedgerModuleConfig } from "@aries-framework/core/build/modules/ledger/LedgerModuleConfig";

const logger = log4js.getLogger("controller");
logger.level = log4js.levels.INFO;

// omit.... 下記のNo2,3のコードがここに入ります。

(async () => {
  try {
    logger.info("initializing a holder agent...");
    const holder = await initializeHolder();

    // did:sov:Vtw2qgmuMVy3rk2ipw7VxtはLedgerに登録済みのIssuerのPublic DID
    logger.info("Ledgerへのアクセス疎通確認");
    console.log(
      `issuer's public did document: ${JSON.stringify(
        await holder.dids.resolve("did:sov:Vtw2qgmuMVy3rk2ipw7Vxt")
      )}`
    );

    // Event Listener群の登録
    logger.info("registering event listeners...");
    registerConnectionListener(holder);
    registerMediationListener(holder);
    registerVCIssuingListener(holder);
    registerProofPresentListener(holder);
    registerRevocNotificationListener(holder);

    // 対Mediator
    // [Aries RFC 0160: Connection Protocol]でのコネクション生成
    // Mediatorで複数Connectionを生成可能なInvitation(multi_use=true設定)を作り、Holderでreceiveする。
    const mediator = await holder.mediationRecipient.findDefaultMediator();
    if (mediator === null) {
      logger.info("crate connections with mediator.");
      holder.oob.receiveInvitationFromUrl(
        "http://172.19.0.4:8040?c_i=eyJAdHlwZSI6ICJkaWQ6c292OkJ6Q2JzTlloTXJqSGlxWkRUVUFTSGc7c3BlYy9jb25uZWN0aW9ucy8xLjAvaW52aXRhdGlvbiIsICJAaWQiOiAiZTdiYjZmOGItMjEzNi00MjAzLTljYTgtZGYxZTJlZjQyNjNmIiwgInNlcnZpY2VFbmRwb2ludCI6ICJodHRwOi8vMTcyLjE5LjAuNDo4MDQwIiwgImxhYmVsIjogIm1lZGlhdG9yIiwgInJlY2lwaWVudEtleXMiOiBbIkcxcHh4NlZVMW9nVk5RUWtxQjhiMkdYTHVtb0x3MVhGZFBWNmFoUjRMdDUyIl19"
      );
    } else {
      logger.info(
        `a mediator has already been setup: ${JSON.stringify(mediator)}`
      );
    }

  } catch (e) {
    logger.error(e);
  }
})();
2. Agent初期化Function
const getGenesisTransaction = async (url: string): Promise<string> => {
  const response = await fetch(url);
  return await response.text();
};

const initializeHolder = async (): Promise<Agent> => {
  const genesisTransactionsOfVon = await getGenesisTransaction(
    "http://172.20.0.1:9000/genesis"
  );
  logger.info(genesisTransactionsOfVon);

  const config: InitConfig = {
    label: "nodejs-holder-agent",
    walletConfig: {
      id: "nodejs-holder-wallet",
      key: "testkey0000000000000000000000000",
    },
    // ここは意味がない。常駐化させる目的のため。
    endpoints: ["http://172.19.0.9:8090"],
    autoAcceptConnections: true,
    useLegacyDidSovPrefix: true,
    logger: new ConsoleLogger(LogLevel.info),
  };

  const agentOption = {
    config: config,
    dependencies: agentDependencies,
  };

  const holder = new Agent(agentOption);
  // Mediatorからのメッセージ受信のため。
  holder.registerOutboundTransport(new WsOutboundTransport());
  // Issuer, Verifierへのメッセージ送信のため。またMediatorとのWS接続の前のConnection生成のため。
  holder.registerOutboundTransport(new HttpOutboundTransport());
  // ここは意味がない。常駐化させる目的のため。
  holder.registerInboundTransport(new HttpInboundTransport({ port: 8090 }));

  holder.ledger.config = new LedgerModuleConfig({
    connectToIndyLedgersOnStartup: true,
    indyLedgers: [
      {
        id: "local-von-network",
        indyNamespace: "local",
        isProduction: false,
        genesisTransactions: genesisTransactionsOfVon,
      },
    ],
  });

  await holder.initialize();

  return holder;
};
3. Event Listener群
(1) Connection
const registerConnectionListener = (holder: Agent): void => {
  holder.events.on<ConnectionStateChangedEvent>(
    ConnectionEventTypes.ConnectionStateChanged,
    async ({ payload }) => {
      const connectionRecord = payload.connectionRecord;
      logger.info(connectionRecord);
      if (connectionRecord.state === DidExchangeState.Completed) {
        logger.info(`Making a connection has been completed.`);
        logger.info(`Their Label : ${connectionRecord.theirLabel}`);
        logger.info(
          `Connection ID: ${connectionRecord.id}, My DID: ${connectionRecord.did}, Their DID: ${connectionRecord.theirDid}`
        );

        if (connectionRecord.theirLabel === "mediator") {
          // 相手AgentがMediatorであった場合

          // MediatorにMediationしてもらう依頼と許可取得
          // 許可がGrantされるとMediationのEvent Listenerが起動する。
          const mediationRecordOnRequesting =
            await holder.mediationRecipient.requestAndAwaitGrant(
              connectionRecord
            );

          // Default Meditorとして設定
          const mediationRecordOnSettingAsDefault =
            await holder.mediationRecipient.setDefaultMediator(
              mediationRecordOnRequesting
            );
          logger.info(mediationRecordOnSettingAsDefault);

          // WebSocketでの接続の確立
          await holder.mediationRecipient.initialize();

          // Mediatorを介したIssuerとの接続のためのInvitatition生成
          // [Aries RFC 0160: Connection Protocol]でのコネクション生成
          // ログに出したInvitationをコピペでIssuer(ACA-Py)にreceiveさせる。
          logger.info("Invitation for an issuer.");
          logger.info(
            JSON.stringify(
              (await holder.oob.createLegacyInvitation()).invitation.toJSON()
            )
          );

          logger.info("Invitation for a verifier.");
          logger.info(
            JSON.stringify(
              (await holder.oob.createLegacyInvitation()).invitation.toJSON()
            )
          );

          // Mediatorを介したIssuerとの接続のためのInvitatition生成
          // [Aries RFC 0434: Out-of-Band Protocol 1.1 / Aries RFC 0023: DID Exchange 1.0]でのコネクション生成
          // ログに出したInvitationをコピペでIssuer(ACA-Py)にreceiveさせる。

          // **ACA-PyがAIP2.0でのdid:peerに対応していないため(現在実装中)、コネクションを張れない。**
          // logger.info(
          //   JSON.stringify(
          //     (await holder.oob.createInvitation()).outOfBandInvitation.toJSON()
          //   )
          // );
        }
      }
    }
  );
};
(2) Mediation
const registerMediationListener = (holder: Agent): void => {
  holder.events.on<MediationStateChangedEvent>(
    RoutingEventTypes.MediationStateChanged,
    async ({ payload }) => {
      const mediationRecord = payload.mediationRecord;
      if (mediationRecord.state === MediationState.Granted) {
        logger.info("Permission for mediation has been granted.");
      }
    }
  );
};
(3) VC発行
const registerVCIssuingListener = (holder: Agent): void => {
  holder.events.on<CredentialStateChangedEvent>(
    CredentialEventTypes.CredentialStateChanged,
    async ({ payload }) => {
      const credentialRecord = payload.credentialRecord;
      // VC発行のプロトコルにおける状態ごとの対応
      switch (credentialRecord.state) {
        case CredentialState.OfferReceived: {
          // 発行オファーを受理した際に動く。
          logger.info(`Received a credential offer.`);
          logger.info(
            `Credential Exchange ID: ${credentialRecord.id}, Connection ID: ${credentialRecord.connectionId}`
          );
          await holder.credentials.acceptOffer({
            credentialRecordId: credentialRecord.id,
          });
          break;
        }
        case CredentialState.RequestSent: {
          // 発行オファーを受理後、発行要求を投げた後に動く。
          logger.info(`Sent a credential request.`);
          break;
        }
        case CredentialState.CredentialReceived: {
          // IssuerがCredentialを発行したときに動く。
          logger.info(`Storing a credential...`);
          await holder.credentials.acceptCredential({
            credentialRecordId: credentialRecord.id,
          });
          break;
        }
        case CredentialState.Done: {
          // Credentialを受理した後に動く。
          logger.info(`a credential has been accepted.`);
          const storedCredentialRecord = await holder.credentials.findById(
            credentialRecord.id
          );
          logger.info(
            `stored credential: ${JSON.stringify(storedCredentialRecord)}`
          );
          break;
        }
      }
    }
  );
};
(4) Proof検証
const registerProofPresentListener = (holder: Agent): void => {
  holder.events.on<ProofStateChangedEvent>(
    ProofEventTypes.ProofStateChanged,
    async ({ payload }) => {
      const proofRecord = payload.proofRecord;
      switch (proofRecord.state) {
        case ProofState.RequestReceived: {
          logger.info(
            `Received a proof request: ${JSON.stringify(proofRecord)}`
          );

          const presentationId = proofRecord.id;
          let requestedCreds = undefined;
          try {
            // Proofの各Attributeに当てはめるClaimを1つに絞る。その工程を自動でやってもらう。
            // 自動選択のロジックはメソッド先を参照。
            // 手動でRetrievedCredentialsからRequstedCredentialsを作ることももちろんできる。
            // 今回の場合は発行済みVCが1つのため絞られるということはない。
            const autoSelectOption = {
              proofRecordId: presentationId,
              config: {
                filterByPresentationPreview: false,
                filterByNonRevocationRequirements: false,
              },
            };

            requestedCreds =
              await holder.proofs.autoSelectCredentialsForProofRequest(
                autoSelectOption
              );
            logger.info(
              `Requested Credential: ${JSON.stringify(requestedCreds, null, 2)}`
            );
          } catch (e) {
            // TSだと例外処理までインターフェイスに含められないため、実質的に
            // IndyProofFormatService#autoSelectCredentialForProofRequestの処理内容を確認した上での前提にしている。
            // つまり上記メソッドで例外が発生するのはこのパターンのみ。今後のAFJのアップデートに際しては注意が必要。
            // 上記メソッドの処理をここで繰り返す手もあるが、こちらの方が良いと判断した。
            if (e instanceof AriesFrameworkError) {
              logger.info(
                `not having all claims which matches the proof request: ${presentationId}`
              );
              await holder.proofs.sendProblemReport(
                presentationId,
                "request declined."
              );
            } else {
              throw e;
            }
            break;
          }

          if (requestedCreds !== undefined) {
            // Proofの提示
            const acceptProofOption: AcceptProofPresentationOptions = {
              proofRecordId: presentationId,
              proofFormats: requestedCreds.proofFormats,
            };
            await holder.proofs.acceptRequest(acceptProofOption);
          }
          break;
        }
        case ProofState.PresentationSent: {
          // VerifierにProofを提示した後に動く。
          logger.info(`a proof was presented.`);
          break;
        }
        case ProofState.Done: {
          // VerifierがProofを検証してackを送信する。それを受信した際に動く。
          logger.info(
            `Proof presentation is done: ${JSON.stringify(proofRecord)}`
          );
          break;
        }
      }
    }
  );
};
(5) VC失効
const registerRevocNotificationListener = (holder: Agent): void => {
  holder.events.on(
    CredentialEventTypes.RevocationNotificationReceived,
    async ({ payload }) => {
      logger.info(
        `Handling a revocation notification event.: ${JSON.stringify(payload)}`
      );
    }
  );
};
細かいことはコード上にコメントで記述しました。
ここからは、上記のコードを紐付けながら、VCモデルにおけるイベントを一通り行った流れを記載します。
動作確認
確認事項
大まかには、以下の2点を確認しました。
- 未失効のVCから成るProofの有効性の検証に成功すること(有効なProofであることの確認)
- 失効済みのVCから成るProofの有効性の検証に失敗すること(無効なProofであることの確認)
結果と課題
上記の事項については上手くいくことを確認できました。ただ、細かい点で1つ課題が残りました。
現象として、MediatorからHolderへの通信はWebSocketにしたかったのですが、ここがHTTPになってしまいました。上記のConnectionに関するEvent ListenerのL32の処理において、確かにWebSocketでの通信を確立したという旨をHolderのログから確認したのですが、実際のMediatorのログではHTTPでメッセージをフォワードしていました。
原因として影響がありそうなのは、(その部分のACA-Pyのコードを深掘りできていませんが、)Holderの初期化部分でNode.jsプロセスを常駐化させるために、本来は不要なHTTPのEndpointを設け、それを利用してWebSocketの前にHTTPによるコネクションを確立したことです。それによりMediator側でWebSocketよりHTTPの通信の方が優先された可能性があると考えます。
React Nativeアプリにする際にはこの設定は不要になるため、課題は一旦後編に持ち越すことにします。
行った流れ
コロンの左部分は右部分の処理のトリガーとなる主体を表しています。
(1) Holder以外の各種コンテナの起動
- 筆者: von-networkを起動する。
- 筆者: Tail Serverを起動する。
- 筆者: ACA-Py(Issuer, Verifier, Mediator)を起動する。
詳細は前述の拙著(c)、(d)、(f)をご参照ください。
Mediator ACA-Pyについて補足すると、環境図のようにHolderとはWebSocketで通信させたく、ACA-PyのTransportに対する起動パラメーターの設定を以下のようにしています。
--inbound-transport http '0.0.0.0' <port> \
--inbound-transport ws '0.0.0.0' <port> \
--endpoint http://<ip>:<port> ws://<ip>:<port> \
--outbound-transport http \
--outbound-transport ws \
Issuer ACA-Pyについて補足すると、IssuerからVCを失効させた際にHolderにその旨のメッセージを通知させたいため、以下の起動パラメータを追加しています。
--notify-revocation
(2) Holderの起動とMediatorとの接続
- 筆者: Holderを起動する。
- Main Function: 初期化処理とEvent Listener群の登録処理後、Mediatorに対するInvitationを作成しロギングする。(このInvitationでは、Holder、Mediator双方ともEndpointはWebSocketではなくHTTPのモノを使う。)
- 筆者: ロギングされたInvitationをコピーして、MediatorのAdmin APIをコールする形でそれをMediatorに受容させる。HolderとMediator間でコネクションが確立される。
- Event Listener(Connection) L20: Mediatorに自身のmediationを行ってくれるよう依頼し許可をもらう。(Mediatorは起動パラメータの設定のより依頼を自動許可する。)Event Listener(Mediation)が起動する。
- Event Listener(Connection) L32: Mediatorとの間でmediationを開始する。つまりはIssuer/VerifierからのメッセージをフォワードするためのWebSocket通信を確立する。(ただし前述の課題の通り、実際のフォワーディングはHTTPで行われる。)
- Event Listener(Connection) L40, L47: IssuerとVerifierとの接続のためのInvitationをロギングする。(このInvitationのHolderのEndpointはMediatorのそれが指定されており、以降、IssuerおよびVerifierからHolderへの通信はMediatorを経由する。)
Mediationの詳細については、 拙著(d)をご参照ください
(3) Issuerとの接続とVC発行
- 筆者: ロギングされたInvitationをコピーして、IssuerのAdmin APIをコールする形でそれをIssuerに受容させる。HolderとIssuer間でコネクションが確立される。
- 筆者: IssuerのAdmin APIを叩き、HolderにVC発行オファーを送信する。(Schemaを含めてオファーの内容は拙著(f)のモノと同様です。)
- Event Listener(VC発行) L14: オファーを受理して、VC発行リクエストをIssuerに送信する。
- 筆者: IssuerのAdmin APIを叩き、HolderにVCを発行する。
- Event Listener(VC発行) L27: 発行されたVCを受理する。
Issuer(ACA-Py)のAdmin API操作の詳細は、拙著(f)をご参照ください。
(4) Verifierとの接続とProof検証
- 筆者: ロギングされたInvitationをコピーして、VerifierのAdmin APIをコールする形でそれをVerifierに受容させる。HolderとVerifier間でコネクションが確立される。
- 筆者: VerifierのAdmin APIを叩き、HolderにProofリクエストを送信する。(Proofリクエストの内容は拙著(f)のモノと同じです。non_revokedはVC発行後の時間にしています。)
- Event Listener(Proof検証) L7~43: リクエストの条件に合致するVC群を抜き出し1つに絞り、VerifierにProofを提示する。
- 筆者: VerifierのAdmin APIを叩き、提示されたProofを検証する。(Proofが有効である結果を確認する。)
- Event Listener(Proof検証) L49~55: 検証した旨のACKを受け取る。
Verifier(ACA-Py)のAdmin API操作の詳細は、拙著(f)をご参照ください。
(5) VC失効とProof再検証
- 筆者: IssuerのAdmin APIを叩き、発行済みのVCを失効させる。Issuerは失効したことのメッセージをHolderに送信する。
- Event Listener(VC失効): Issuerから特定のVCが失効したというメッセージを受信する。
- 筆者: von-network上で失効によりRevocation Registry Entryの新たなTransactionが生成されていることを確認する。
- Proof再検証の流れは上記(4)と同様。ただ今回は失効したことによりProofが無効である検証結果が出る。
Issuer(ACA-Py)のAdmin API操作の詳細は、拙著(f)をご参照ください。
行った流れとその結果は以上です。
おわりに
前編となる当記事では、(前述した課題が残ったものの)Node.js環境でAFJを利用して疑似的なHolder Agentを作り、VCモデルを一通り回すことができました。後編に向けたAFJの把握という目的を達成できたと思います。
Walletのマスターキー周りの話をする中編を挟み、後編では同じようにAFJを利用しながら、今度はReact NativeアプリとしてHolder Agentを作り動かす様子をお届けしたいと思います。
どなたかのお役に立てたならば幸いです。